Dashboard
We can find the Dashboard on the home page of myBus Manage. It contains shortcuts to some special control functions such as: Line Diagram, Map, and Calendar.

Line Map
In the dashboard view, we find a shortcut to Maps. This map helps us visualize buses in real-time.
The following list shows the legend of possible bus states:
- On time
- At terminus
- Delayed
- Ahead of schedule
- Heading to terminus
- Lost
- Out of service
- Disconnected
- No GPS
- Scheduled without data
- Frequency punctuality
This list can be displayed in the app by clicking the info button located at the top left of the map.

Next to the info button, there is also another button with a megaphone and exclamation icon . If this button appears with a red background, it means there are active incidents pending review. Clicking on it will take us to the Incidents window.
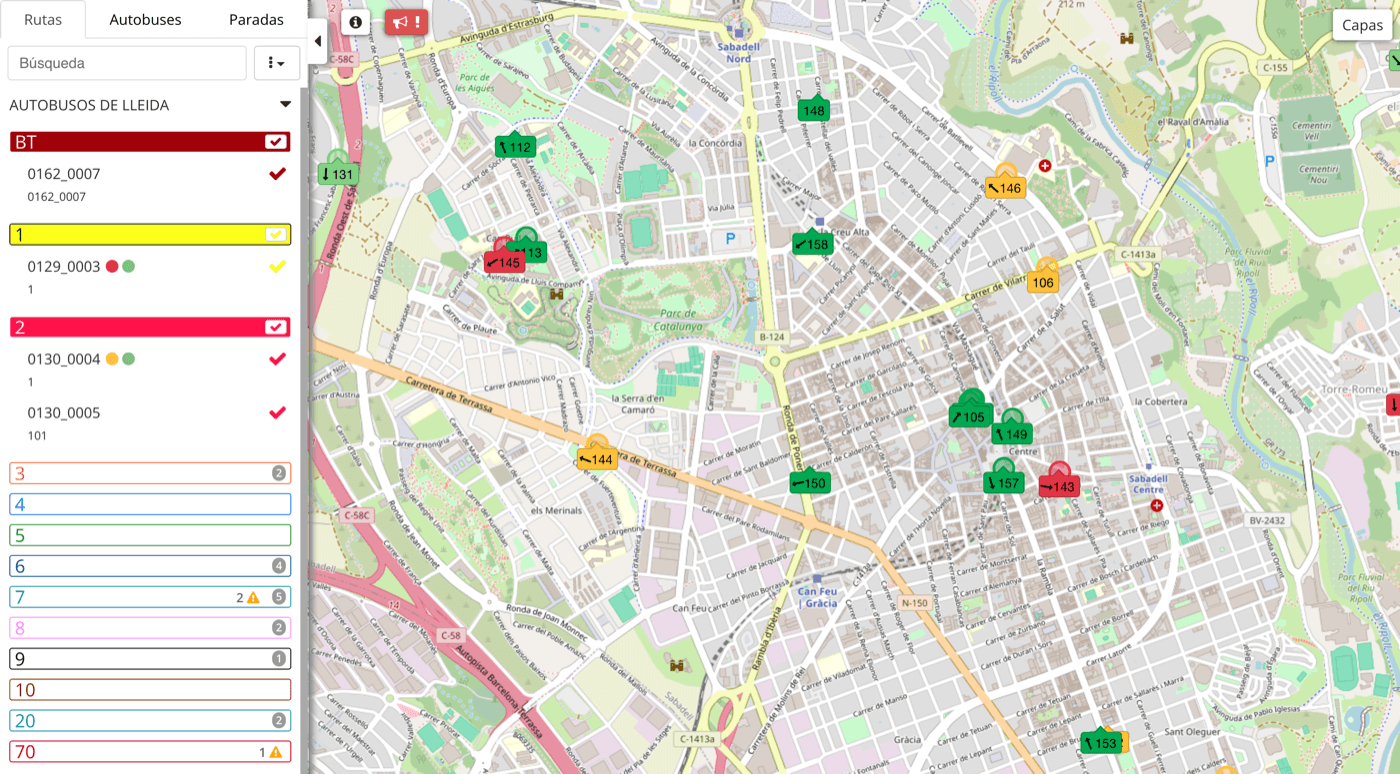
Tab Routes
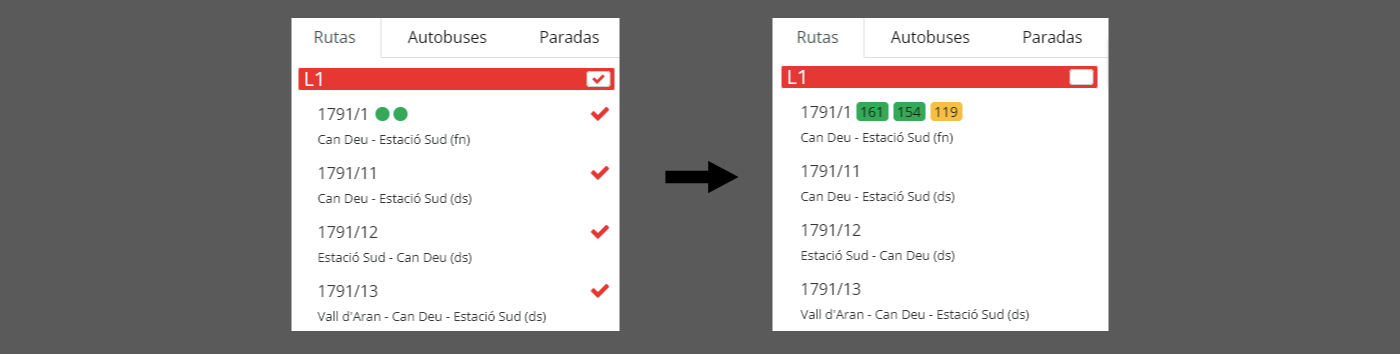
To show or hide lines and routes, click on the routes tab in the left menu and check or uncheck the checkbox for the line.
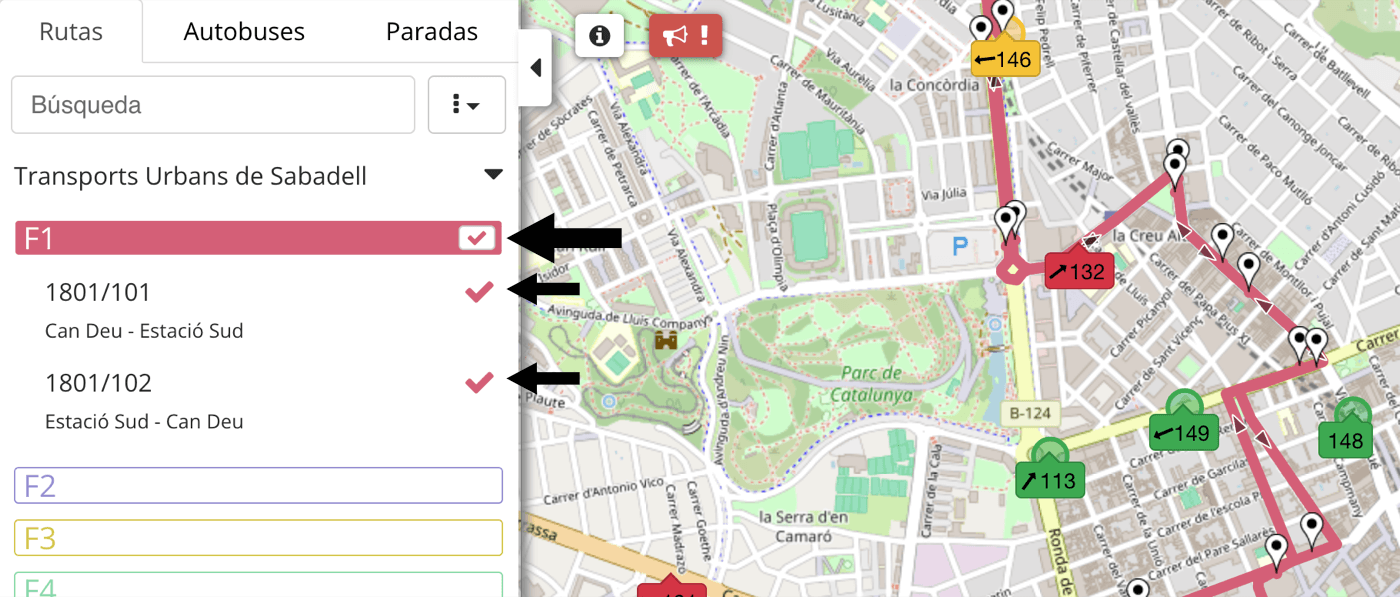
You will also see the buses running on each route, represented by a dot, colored according to the vehicle's status. Clicking on that dot will display the vehicle's information on the map.
We can configure the display from the dropdown menu next to the search bar:
- Active Routes Only
- Show Arrows on Route
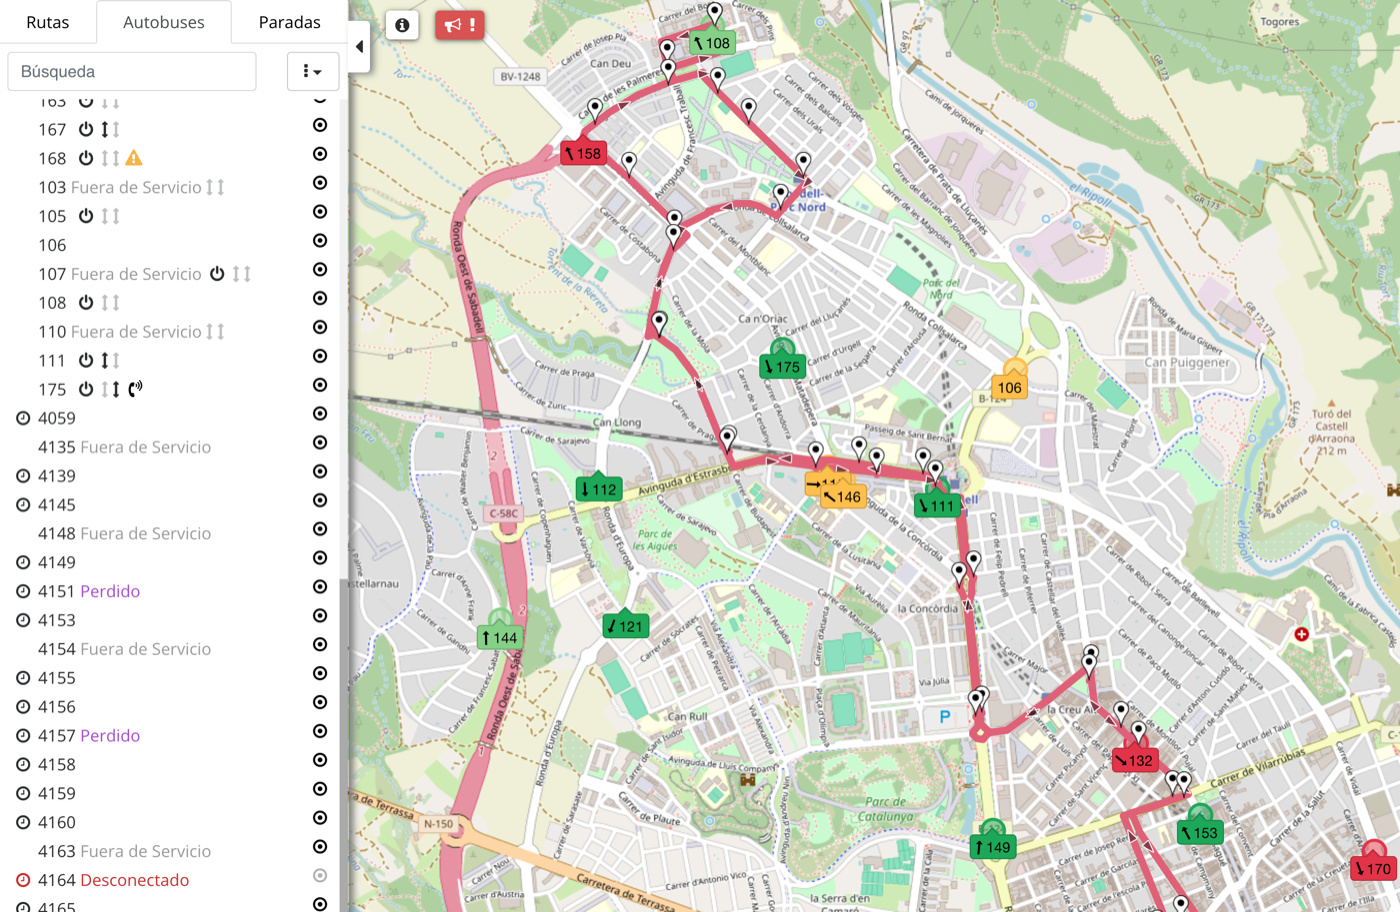
Tab Buses
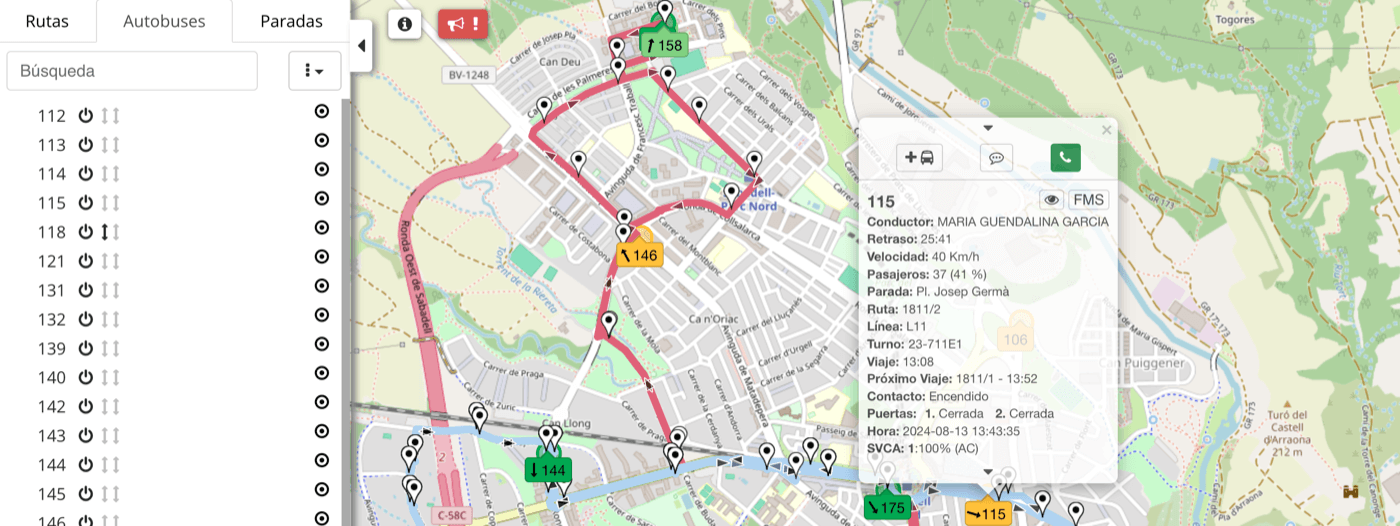
In the left dropdown menu under the Buses tab, you will see a list of all the agency's vehicles.
On the right of each bus, we will find a dropdown with different options, such as:
- Center Bus on the Map
- Add Reinforcement
- Replace Driver
- View Today’s Trips
- Open Chat
- Call Vehicle
In addition to the menu, we can see the following icons:
- If there is a clock icon on the left, it means the vehicle is scheduled.
- The exclamation icon on the right indicates that the vehicle is sending a parameter out of range. This could be high occupancy or any other parameter from the FMS outside of the allowed range. Hover over the icon to find out what the warning refers to.
- The arrows represent the 2 doors of the vehicle, if they are gray it means they are closed, and if they are black, they are open.
- The power icon indicates whether the vehicle is on or off.
- If the vehicle is on a call, a phone icon will appear.
The three dots next to the search bar display a dropdown menu where we can choose to view disconnected buses, as well as all buses (both in service and disconnected).
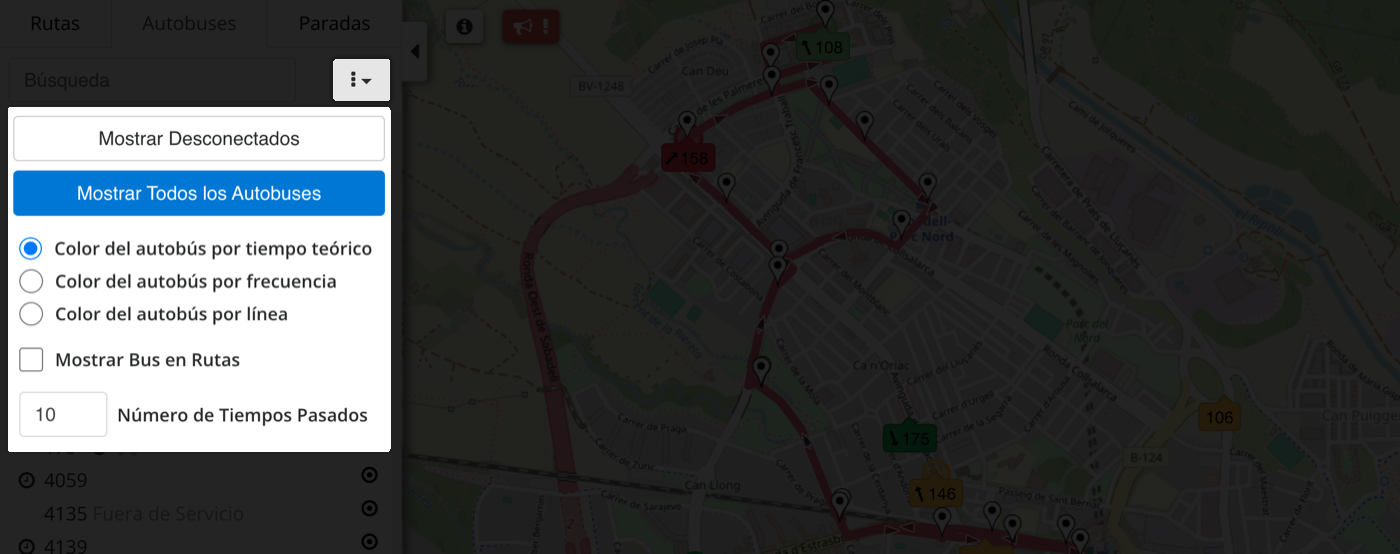
We can also choose to visualize the bus colors based on the following three parameters:
- Bus color by theoretical time: This will show whether the bus is ahead or delayed according to the theoretical schedule compared to reality. This will be the default option selected.
- Bus color by frequency: Only routes that we have defined to operate by frequency, those using antibunching, and which have a bus ahead, will be shown this way. If the vehicle is displayed by frequency, a blue circle will appear around the number. We can edit the advance or delay parameters in this same dropdown.
- Bus color by line: The bus will be colored the same as the route it follows.
The Show Bus in Routes option will display the bus name in the Routes list instead of a dot.
By clicking on the buses, either in the list or on the map, the relevant information will be displayed. The down arrow reveals additional information. We can also call, send messages to that vehicle, view the FMS values, or add a reinforcement bus.
Communication Tab
A Communication tab can be added to these tabs, through which we can perform the following actions regarding Calls and Chats:
- View all Pending Calls. The button itself includes a red circle with the number of pending calls.
- Access the History, both for Calls and Chats.
- Make a call, mobile or web depending on the service contracted, or open a chat.
The Communication tab will include a warning icon when there are pending calls, to alert us that this section requires attention.
FMS
The FMS is a module for reading Can Bus data. This allows us to obtain many parameters from the vehicle in real time.
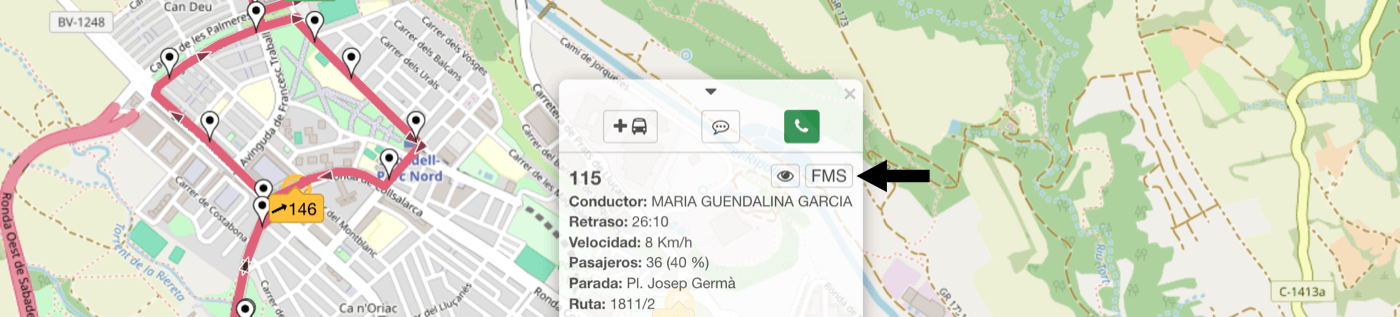
If we click on the button, located when expanding the vehicle information, a window with real-time data from the module will appear.
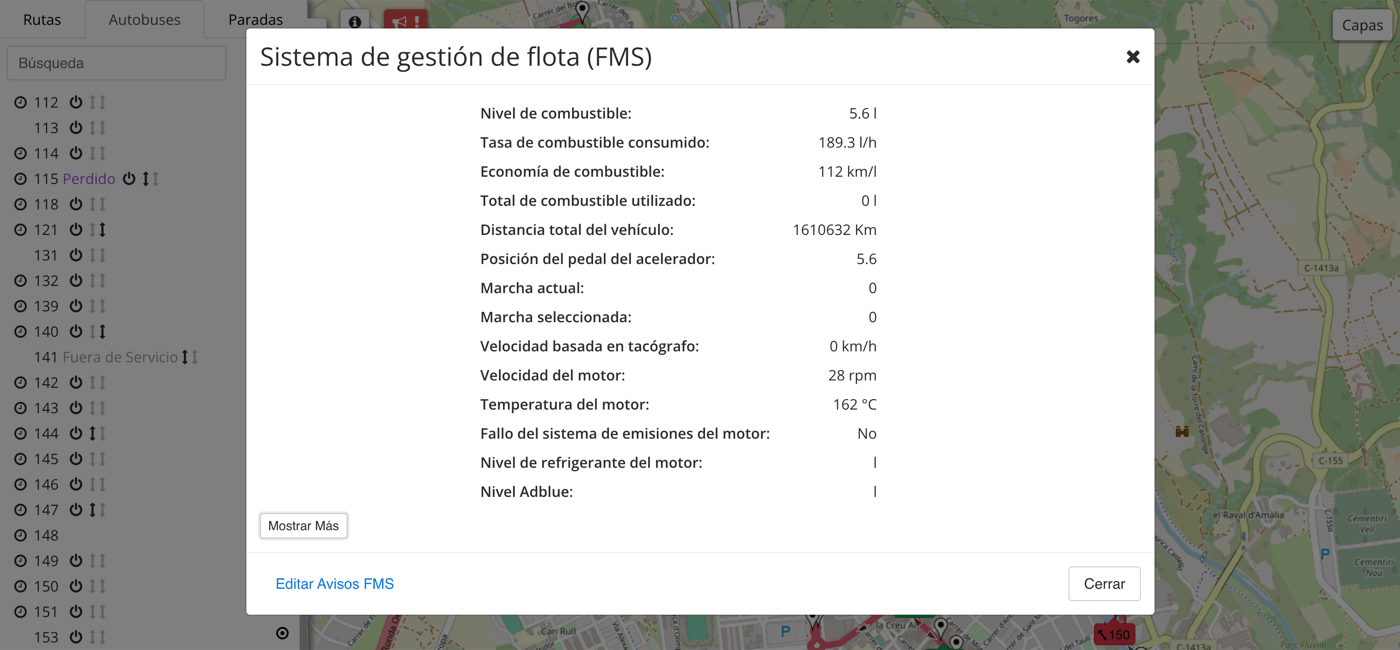
If we want the system to show FMS alerts, click on Edit FMS Alerts and the following window will appear.

Select the parameters you want to generate an alert for with the blue checkbox, enter the number, and click the button.
To reset everything, click on . (Alert settings are saved in the browser. If you use a different browser, you will need to re-edit the alerts).
Add reinforcement
If, when expanding the bus information, we click on the bus button with the plus symbol , a window will open to add a reinforcement bus to that route.
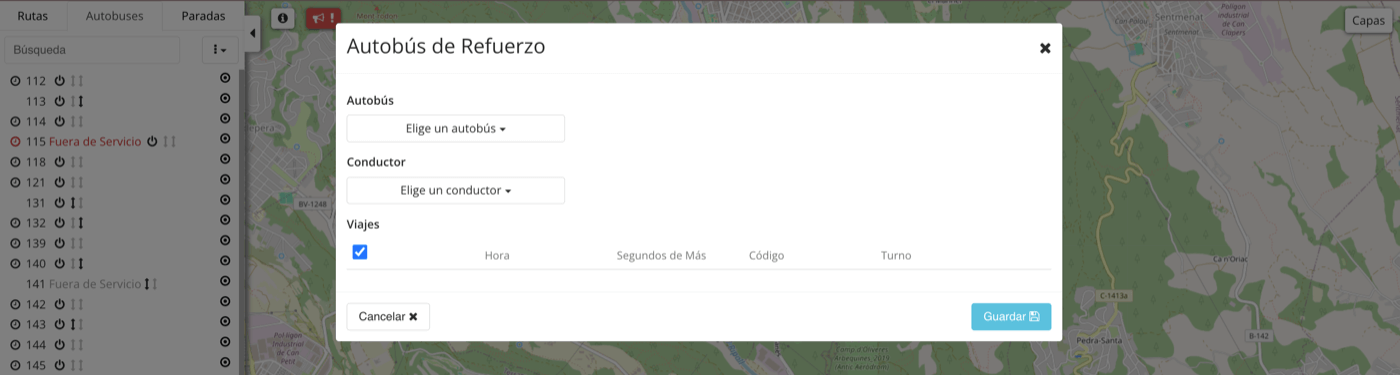
To travel, along with the original vehicle, the remaining trips, we select an available vehicle and an available driver. We choose the trips we want the bus to make and add seconds if we want more time compared to the original vehicle.
Stops Tab
If we click on the stops, either in the left menu or on the map (represented with a position pin ), the real-time arrival and departure time information will expand. This information is the same that would be shown on the street screens if available.
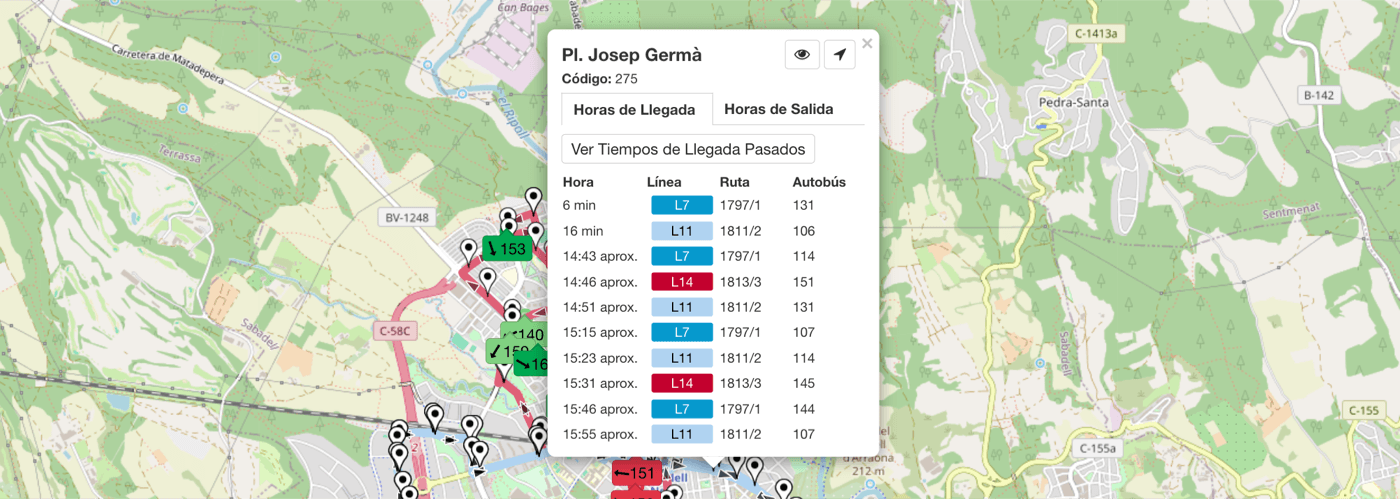
From the stops list in the left dropdown menu, we can also center the stop on the map by clicking on the target . And if we click on the lock , the stop will always be visible, regardless of the selected line.
In the menu that expands from the button with 3 dots , we can find the options Show route stops, which focuses the map on only the stops of a specific route, and Show all stops, managed by the selected agency.
Create Real-Time Alert
Real-time alerts are used to inform passengers about service incidents or other relevant trip information. These can be displayed in 3 locations: Google, the vehicle's internal audio, or as text on the interior screens.
To create an alert, click the megaphone button on the left side of the map. Click on , give it a name and description, and select where you want it to apply:
- Agency
- Line
- Trip
- Stop
Next, select where you want to add the alert:
- Audio in affected vehicles
- Screens in affected vehicles
You can add a cause and an effect or leave it empty.
If you select vehicle screens, you must define how many seconds the alert should be displayed.
If you select vehicle audio, you also define every how many seconds it should repeat and every how many stops. If you want it to play at every stop, leave it as 1.
Select a language, enter a title, the alert message, and optionally a URL. Add as many languages as you wish; each language will be displayed for the number of seconds defined.
If you also want the alert to be heard inside the vehicle, select the voice you want for the TTS. By clicking the button, you can hear how the audio sounds.
Next, define when it will be shown using intervals. Set a start date/time and an end date/time (maximum duration is 48h).
Click on and you will see the list of all active incidents. They can be edited via the Edit icon or deleted using the Delete button .
The megaphone icon on the map will now turn red, indicating that there are active alerts.
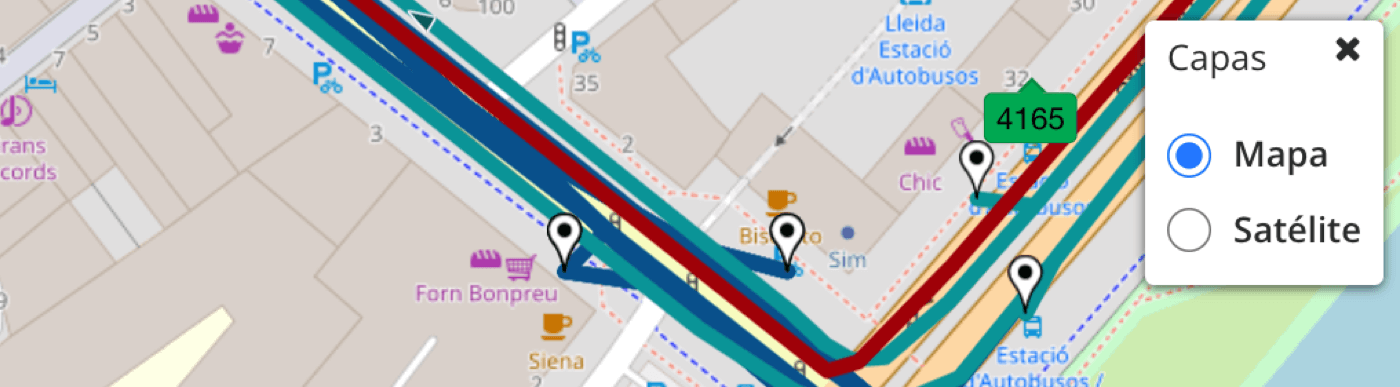
Layers
In the top-right corner of the map, in the Layers button, we can see different map visualizations, including Air Quality.
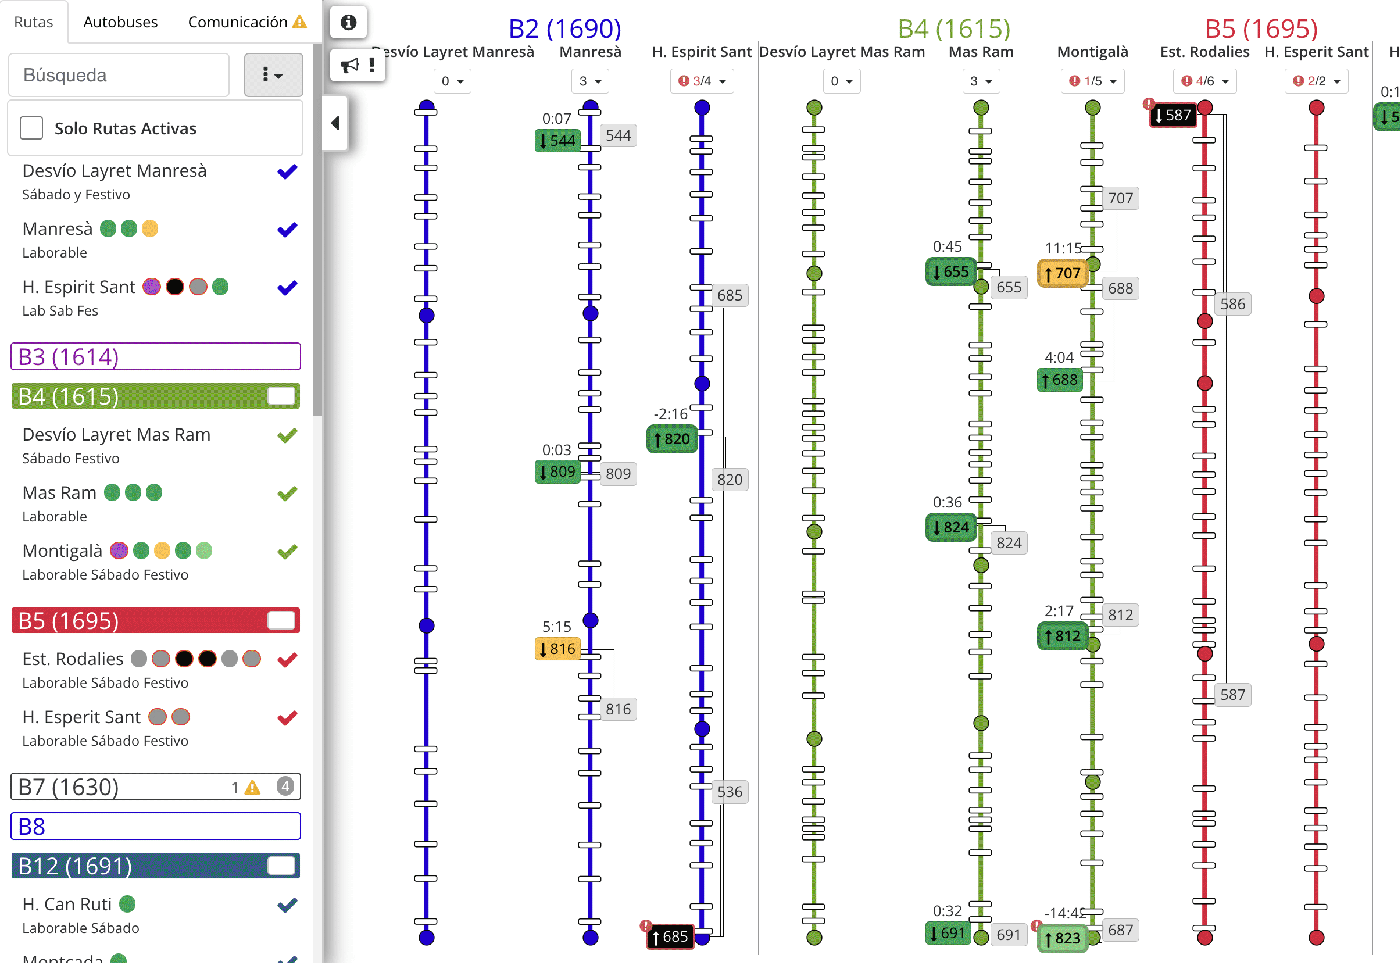
Line Diagram
In the Dashboard view, we find the shortcut to the Line Diagram. This diagram, like the Line Map, helps us visualize buses in real time. But here, it does so schematically, in the form of vertical lines.
Routes Tab
On the left side, there is a tab menu that helps us find and select everything visible on the screen. The Routes tab works the same way as the Routes Tab in the Line Map view.
Buses Tab
The Buses tab works in the same way as the Buses Tab in the Line Map view, but with some differences. In this case, the option to center the vehicle in the view is removed.
Communication Tab
A third Communication tab can be added to these two tabs, through which we can perform the following actions, regarding Calls and Chats:
- View all the Pending Calls we have. The button itself includes a red circle with the number of pending calls.
- Access the Histories, both for Calls and Chats.
- Make a call or open a chat.
The Communication tab will show a warning icon when we have pending calls, to alert us that this section requires attention.
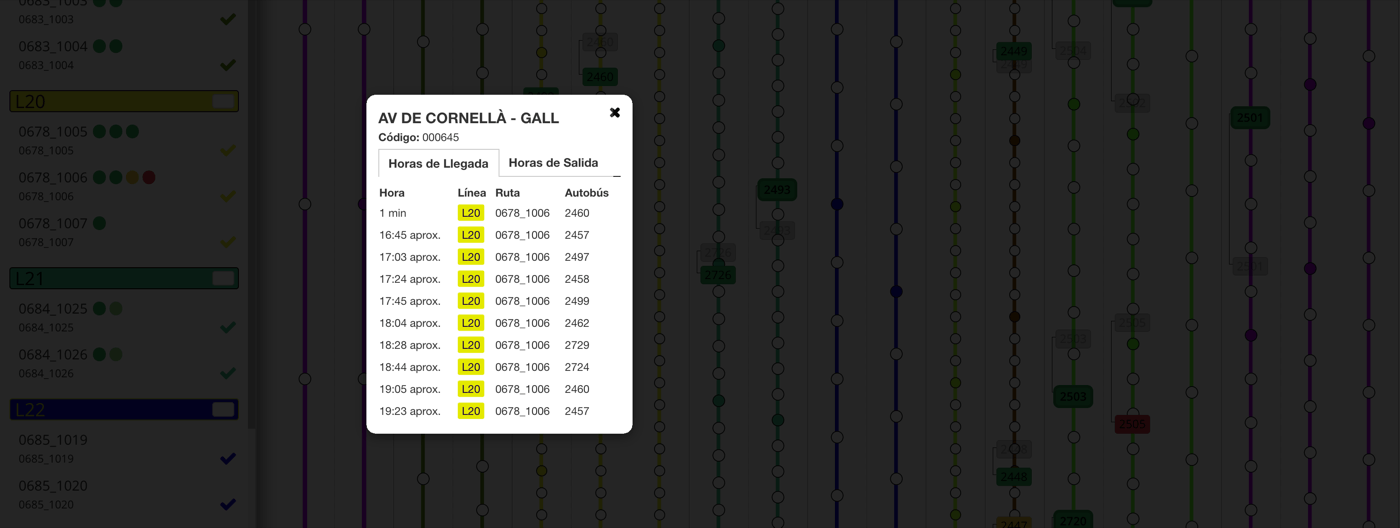
The circles inside the lines represent the stops. We can hover the mouse over them to see which stop it is or click to expand information about the arrival time.
Arrival times in bold indicate theoretical times. The rest are real-time times.
To see past arrival times, we click on View past arrival times and a popup will appear with the vehicles that have already passed that stop.
Stops by Distance and Active Routes Only
By clicking the 3 dots dropdown , we find two checkboxes:
- Stops by Distance (your agency may have it enabled by default). This option allows us to view the axes with stops distributed proportionally to the distance between them. The Reference Stops will continue to be displayed the same way (a circle of the color of the Line), but the other stops will be shown as a small rectangle to visually accommodate nearby stops.
- Active Routes Only. This option hides all routes that do not have a scheduled bus for the day.
Bus Visualization
Within the lines, we can see, in real-time, the buses in operation, highlighted by the vehicle's status color (See the Line Map section to access the color legend). This list can also be expanded by clicking the information button located at the top left of the map. The buses also include an arrow showing the direction they are traveling.
Also, just like in the Line Map, next to the information button, we have a button with an icon of a megaphone and an exclamation . If this button appears with a red background, it means there are active incidents pending review, and by clicking it, we can access the Incidents window.
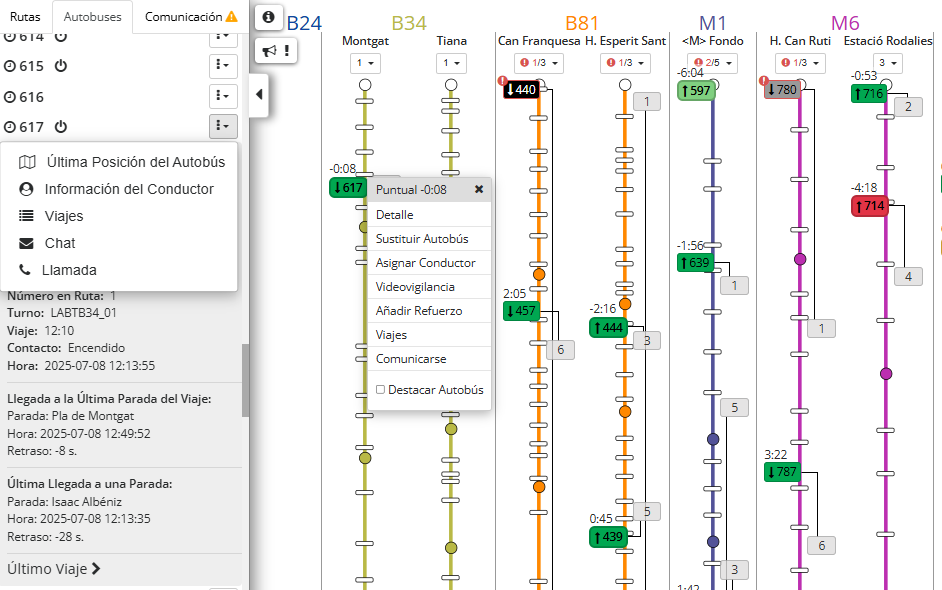
To improve visualization, each bus's label is now distributed in two positions:
- On the left side of each axis, we show the vehicles in real-time.
- On the right side, we show the ghost version of the bus, indicating where it should theoretically be.
Above the label representing the vehicle, there is a gray number that represents the delay or lead time (if this number is positive, it means the vehicle is delayed; if negative, it means it's ahead).
Hovering over a bus label will show a small tooltip with the bus size and the driver's name.
By clicking on a bus label in the Line Scheme, a dropdown will open with available actions for that vehicle. These actions include:
- Detail. Shows the bus's detailed real-time information.
- Replace Bus. Allows replacing the vehicle performing the route.
- Assign Driver. Allows replacing the driver performing the route.
- Video Surveillance. Shows real-time video surveillance cameras.
- Add Reinforcement. Allows adding a reinforcement bus. Clicking this option opens a dialog window where we can select a vehicle and a driver to add as reinforcement to the trip the selected bus is doing (and to the other trips assigned to it).
- Trips. Displays all scheduled trips for that bus.
- Communicate. Allows communication with the bus by opening the chat dialog window or the call tab, with the bus automatically selected.
- Highlight Bus. Highlights the bus by making its label blink.
At the top of each line, next to the Route code, we can see a button with a number indicating how many buses are circulating on that route. By clicking this button, a popup will show the list of buses running on that route and their Status. If there is any bus that, although scheduled, is disconnected, not sending GPS signal, lost (off-route) or a vehicle is overcrowded, a red exclamation icon will appear next to the number of buses.
On the right side of each bus, we can also see a 3-dot icon that will open the same dropdown that can be opened by clicking on the label of